

Navicat Monitor for MySQL/MariaDB is an agentless remote server monitoring tool that is packed with features to make monitoring your database (DB) instances as effective and easy as possible. Moreover, its server-based architecture makes it accessible from anywhere via a web browser, thus providing you unhampered access to easily and seamlessly track your servers from anywhere in the world, at any time of day or night.
Once you have finished installing Navicat Monitor and have logged in, you're ready to create the instances you want to monitor. In today's blog, we'll learn how to configure a DB instance for monitoring.
Creating a New Instance
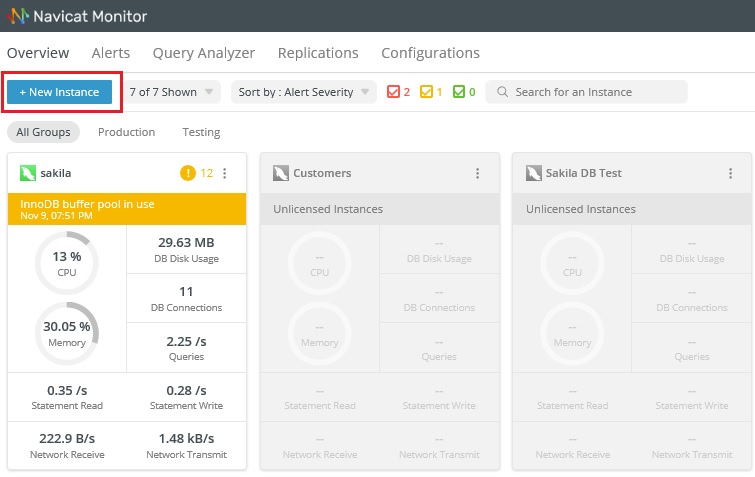
You can create new instances on the following pages by clicking "New Instance" and selecting the server type. You'll find the New Instance button on both the Overview and Configuration screens. Did you know that you can create up to 1000 instances?!
The Overview dashboard page shows all instances that are monitored by Navicat Monitor. It provides high-level summary information and the healthy status of your instances, and identifies instances which require critical attention.
Instance information is presented on instance cards that let you identify the server status and system resource usage. To create a new instance to monitor your server, click on "New Instance" and select the server type from the dropdown list:
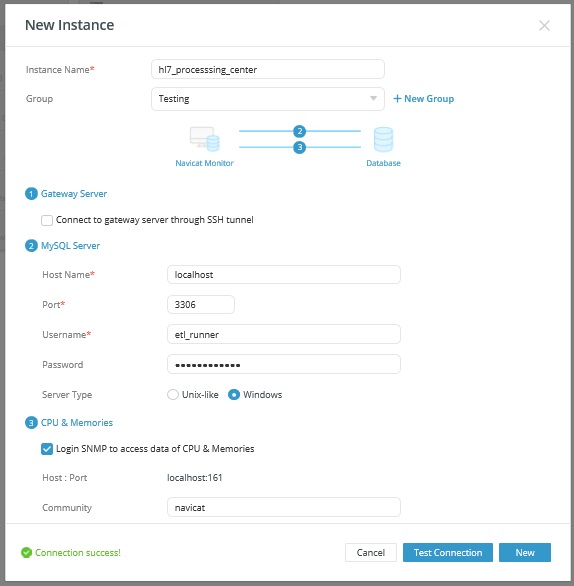
Then, enter the appropriate information in the New Instance window.
In the New Instance window, enter a descriptive name in the Instance Name field. I like to give the instance the same name that I gave it in Navicat Premium. Select the Group for your instance. If you want to add a new group, you can do so by clicking "New Group". Then, provide the following information to connect your server:
Navicat Monitor can connect the database server over a secure SSH tunnel to send and receive monitoring data. It allows you to connect your servers even if remote connections are disabled or are blocked by firewalls.
In the MySQL Server or MariaDB Server section, enter the following information:
- Host Name: The host name or IP address of the database server.
- Port: The TCP/IP port for connecting to the database server.
- Username: A monitoring user for connecting to the database server.
I would recommend creating a separate account for the monitoring user which does not cause load on the monitored instance. You should grant REPLICATION CLIENT, SUPER, PROCESS and SELECT privileges on all database objects to the monitoring user. - Password: The login password of the monitoring user.
- Server Type: The type of the server. Can be Unix-like or Windows.
Navicat Monitor can also collect the DB server's system performance metrics such as CPU and memory resources. If you do not provide this login, you can still monitor your server, but system performance metrics will not be shown.
Finally, click "New "to create the new instance.
Here's the New Instance dialog with all of the fields filled in:
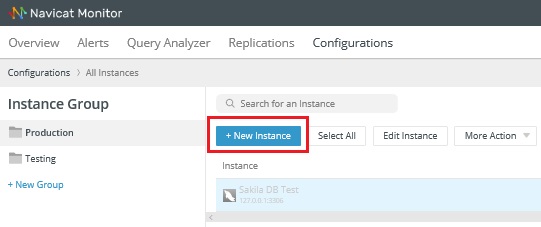
Here's the "New Instance" button on the Instance Configuration screen. It's accessible via Configurations > All Instances:
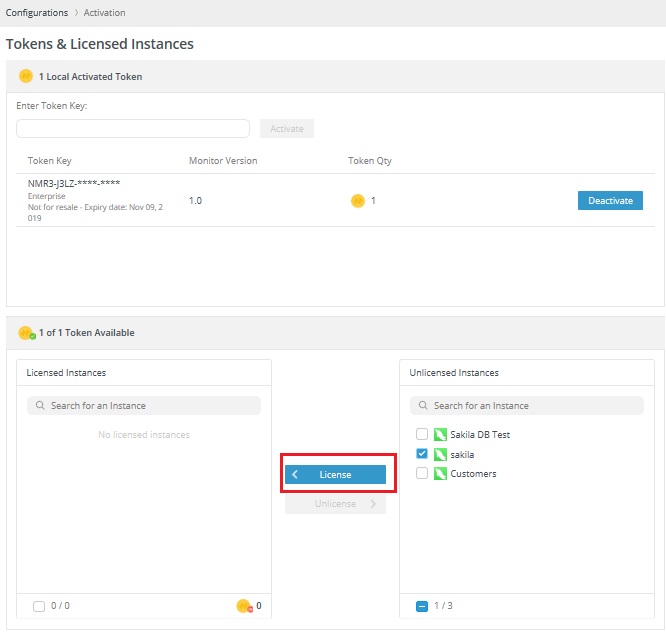
Token Activation
Once your trial period is finished, Navicat Monitor requires tokens to continue monitoring that instance. Tokens may be purchased from the Navicat website. To manage your tokens and license your instances, go to Configurations > Activation.
To activate the instance, locate it in the Unlicensed Instances list, check the box beside it, and click the License button to move it into the Licensed Instances list:
You're now ready to start monitoring your instance!


