

Part 1: Securing the Root Account
Managing the users of a database is one of the key responsibilities of the database administrator (DBA). Coordinating how users in your organization access your database typically entails many separate tasks, from adding new users, blocking access to users who have left the organization, and helping users who cannot log in.
MySQL ships with the mysqladmin command-line client for performing administrative operations. You can use it to check the server's configuration and current status, to create and drop databases, and more. For DBAs who prefer something a little more sophisticated, Navicat for MySQL and Premium includes everything you need to manage your MySQL users so that you don't ever have to launch a separate command window. In this series, we'll explore how to perform common user administration tasks from within Navicat. Today's blog describes the three default MySQL user accounts and how the secure the root user.
Although we'll be using Navicat Premium for the purposes of this blog, keep in mind that Navicat for MySQL includes the same functionality, but specifically targeting MySQL.
Default User Accounts
User management functionality is accessible via the User button. Clicking it displays the Objects tab, which includes all of the registered users for the MySQL connection.
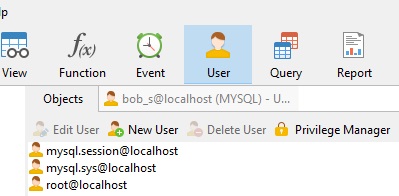
The above image shows the default user accounts. During installation, MySQL creates three user accounts that should be considered reserved:
- 'root'@'localhost: The super user. This account has all privileges and can perform any operation.
Strictly speaking, this account name is not reserved, in the sense that you can (and, in production environments, should!) rename the root account to something else to avoid exposing a highly privileged account with the widely-known default name. - 'mysql.sys'@'localhost': Used as the DEFINER for sys schema objects. Use of the mysql.sys account avoids problems that occur if a DBA renames or removes the root account. This account is locked so that it cannot be used for client connections.
- 'mysql.session'@'localhost': Used internally by plugins to access the server. This account is locked so that it cannot be used for client connections.
Editing User Details
If we wanted to view and/or modify the details of a user, we could either double-click it or highlight it in the Objects tab and then click the Edit User button on the Objects toolbar. That opens an Editor tab for that user. It, in turn, contains five tabs named General, Advanced, Server Privileges, Privileges, and SQL Preview. We'll cover each of these tabs in greater detail in the next installment, but for now, let's see how we could change some data on the General tab to secure the root account.
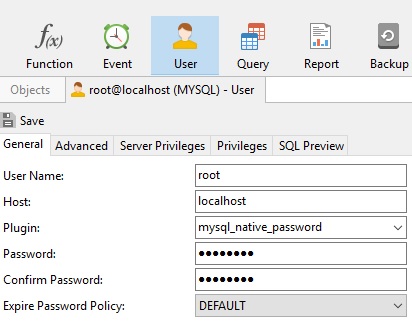
- It is common knowledge that the "root" account is the super user. Therefore, our first action should be to change it to something less intuitive, like "secure_admin_99". The addition of numbers makes it that much harder to guess.
- Choose the sha256_password plugin.
In all versions of MySQL Server since version 5.5, the default password mechanism is implemented in the mysql_native_password authentication plugin (which is enabled by default). This mechanism leverages SHA1 hashing. While this algorithm was considered secure back in the days of MySQL 4.1, it now has known weaknesses that may be exploitable within several years.
The sha256_password plugin was introduced in MySQL Server 5.6, and provides additional security focused on password storage. It does so by addressing the two key elements which make mysql_native_password vulnerable: hash computation becomes more expensive/time-consuming, and the output is randomized. Additionally, using the stronger SHA-256 algorithm provides eliminates dependencies on the vulnerable SHA1 algorithm. - Provide a strong password.
Strong passwords should be difficult to guess or crack. A good password:
- Is at least eight characters long.
- Doesn't contain your user name, real name, or company name.
- Doesn't contain a complete word.
- Is significantly different from previous passwords.
- Contains uppercase letters, lowercase letters, numbers, and symbols.
- Provide an Expire Password Policy.
By specifying an interval, we can have MySQL prompt users to change their password after a certain number of days have elapsed, such as 90 days.
Here is the General tab again with the updated fields:
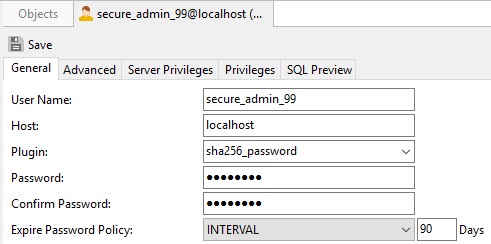
Click the Save button to update the account settings.
Going Forward
In the next installment, we'll learn how to create new users and assign their privileges.


