

Part 1: Connecting to a Remote Database Instance
Remote work has been on the rise for some time now. Today, for those organizations still operating during the Covid-19 pandemic, it has become a necessity. Luckily, popular database systems (DBMS) have long supported remote connections. Likewise, Navicat's database development and administration products are also well equipped to access databases remotely. In today's blog we'll learn how to establish a secure connection to a remote database instance using Navicat Premium 15.
Local vs. Remote Databases
While it is possible for database and client software to be installed on the same computer, in practice, that tends to only be the case for local development purposes. In an organizational setting, the database usually resides on a server that may be part of the organizational infrastructure or in the Cloud. In either case, the mechanisms for connecting to the database are much the same.
TCP/IP
TCP/IP is short for Transmission Control Protocol/Internet Protocol. It's really a suite of communication protocols used to interconnect network devices over the Internet. However, TCP/IP can also be employed as a communications protocol in a private LAN or WAN network. It's the easiest way to connect to a remote database, but offers the least security because unless the database and client(s) who interact with it both reside within an enclosed network, the data may be seen by anyone who cares to watch.
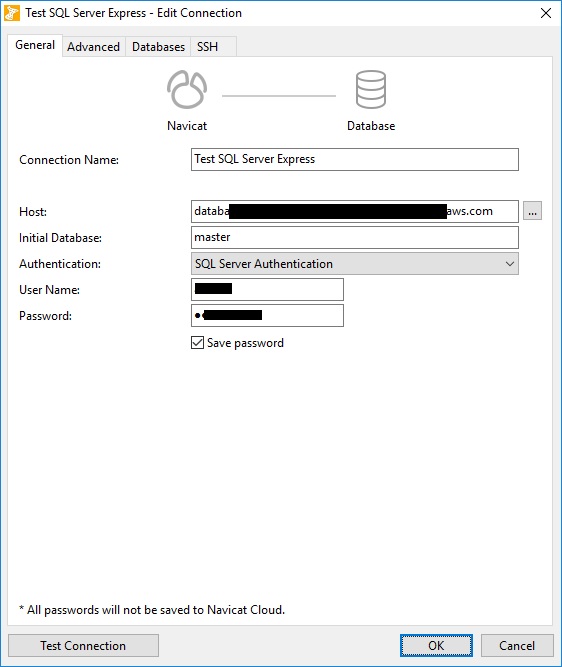
To establish a connection to the database, you must supply and endpoint. It can be the IP address of the database server or a domain such as acme.com. In some cases a port number will also be required. Here's the connection to an SQL Server instance running on Amazon AWS from Navicat for SQL Server:
In the case of TCP/IP connections, it is imperative that you utilize a secure user password.
SSH Tunneling
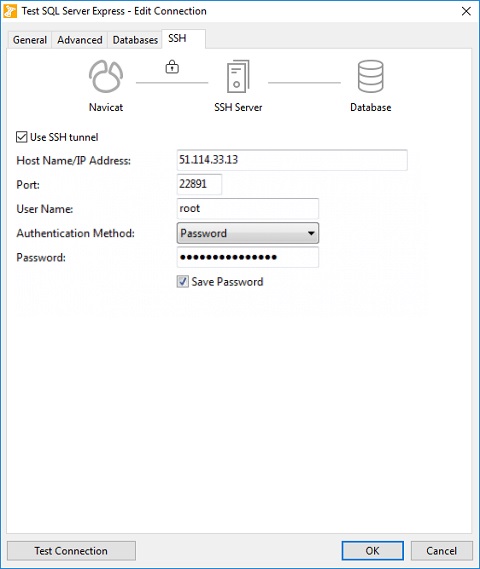
If you require a more secure connection, you can use SSH Tunneling. SSH stands for "Secure Shell server". It's called a tunnel because it allows you to "tunnel" a port between your local system and a remote server. Traffic is sent over the encrypted SSH connection, so it can't be monitored or modified in transit.
Here's the completed SSH screen in Navicat:
Secure Sockets Layer(SSL)
Another option for securing transmissions between the client and database is SSL. It's a protocol that was initially developed for transmitting private documents over the Internet. SSL works by binding the identities of entities such as websites and companies to cryptographic key pairs via digital documents known as X.509 certificates. Each key pair consists of a private key and a public key. The private key is kept secure, while the public key can be freely distributed via a certificate. Hence, before you can establish a secure connection, you must first install the OpenSSL Library and a certificate from a trusted authority.
To provide authentication details in Navicat, enable Use authentication and fill in the required information:
- Client Key File:
The SSL key file in PEM format to use for establishing a secure connection. - Client Certificate File:
The SSL certificate file in PEM format to use for establishing a secure connection. - CA Certificate File:
The path to a file in PEM format that contains a list of trusted SSL certificate authorities. - Specified Cipher:
A list of permissible ciphers to use for SSL encryption.
Conclusion
In today's blog we learned how to establish a secure connection to a remote database using Navicat. In part 2, we'll learn how Navicat Cloud allows you to collaborate with team members from across town to around the globe.
Navicat Premium 15 adds over 100 enhancements and includes several new features to give you more ways that ever to build, manage, and maintain your databases than ever before!


