

Unlike synchronization, which is a one-time process that brings the schema and data of two databases in sync, replication is a process that continuously (automatically) reproduces data between two databases (although schema updates are also possible). Replication may either be done asynchronously, so that a permanent connection between the two databases is not required, or during non-peak hours, when there is little traffic on the database server, for instance, during the late-night hours.
The main role of replication is to create an amalgamated repository of all user databases and/or disseminate the same level of information amongst all users. In either case the result is a distributed database in which users can access data relevant to their tasks without interfering with the work of others. The implementation of database replication for the purpose of eliminating data ambiguity or inconsistency among users is known as normalization.
In the Database Synchronization Strategies whitepaper, we explored some strategies for synchronizing two databases that are of the same and of dissimilar type, using the Navicat Premium Database Management System. In today’s follow-up, we’ll cover how to automate database replication using Navicat Premium’s new Automation utility.
Replication Types
Database replication can be done in at least three different ways:
- Snapshot replication: Data on one server is simply copied to another database on the same or on a different server.
- Merging replication: Data from two or more databases is combined into a single database.
- Transactional replication: Users receive full initial copies of the database and then receive periodic updates as data changes.
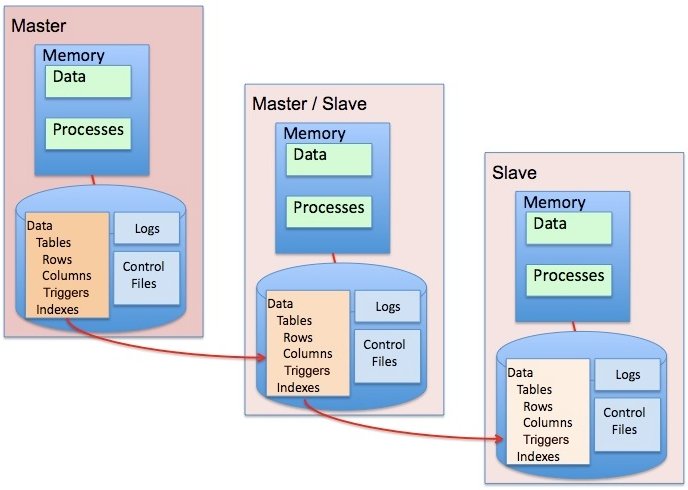
In a distributed database management system (DDBMS) changes, additions, and deletions performed on the data at one location are automatically reflected in the data stored at all the other locations. Doing so ensures that every user accesses the same data set as all the other users.
Like synchronization, replication can be either Homogenous or Heterogeneous:
- Homogenous: Same source and target DBs, i.e. Percona to Percona, MariaDB to MariaDB, MySQL to MySQL.
- Heterogeneous: Dissimilar source and target DBs, i.e. Oracle to Microsoft SQL Server, PostgresSQL, to Amazon DynamoDB, MySQL to Amazon Aurora
A scenario where Heterogeneous replication would be required would be where one or more external business partners employ a different database type than our own. Automated regular data replication between the two environments is often an integral part of such an arrangement.
Navicat Premium’s Automation Utility
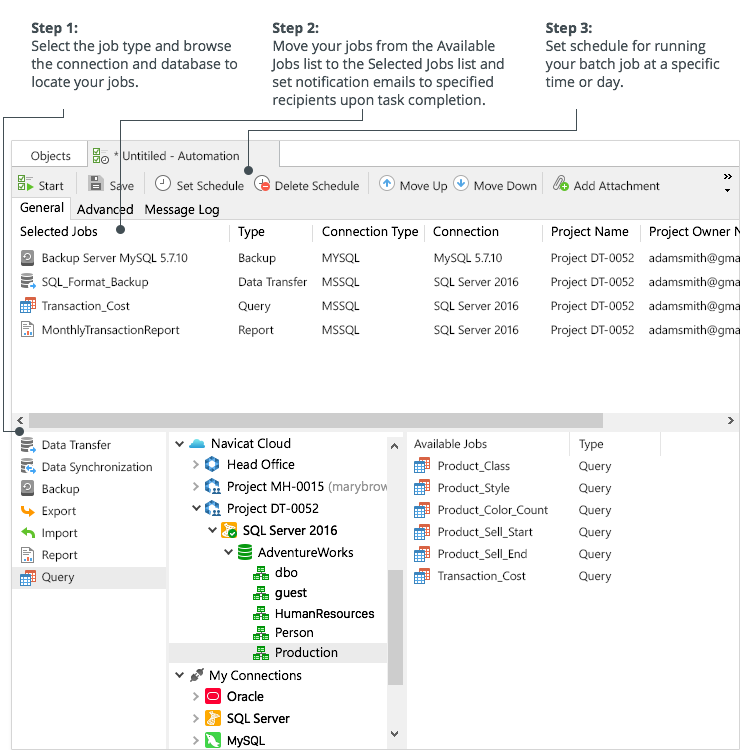
Introduced in version 12, Navicat Premium’s new Automation utility features an easy-to-use and intuitive interface for creating automated batch jobs. Automation is the execution of a process at one or more regular intervals, beginning and ending at a specific date and time, much like Windows Task Scheduler. In addition to replication, it can be utilized for a variety of jobs, including backups, queries, and reports.
Figure 1: Navicat Premium 12 Automation utility in Windows

Figure 2: Navicat Premium 12 Automation utility in macOS
The User Database
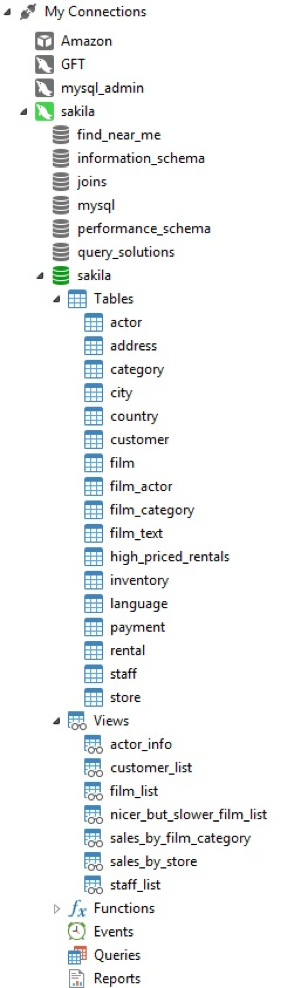
We’ll be using the Sakila Sample MySQL Database as our user database. It was developed by Mike Hillyer, a former member of the MySQL AB documentation team, and was created specifically for the purpose of providing a standard schema for use in books, tutorials, articles, and the like.
It’s themed around the film industry and covers everything from actors and film studios to video rental stores. The full schema structure can be viewed on the MySQL Dev site, if you’re interested.
For instructions on setting up the Sakila database using Navicat, see the Generating Reports on MySQL Data article on databasejournal.com.
Sakila MySQL database structure in Navicat Premium 12
Snapshot replication
As described above, Snapshot Replication puts two databases in sync by copying data from one database to another on the same or on a different server. It is the simplest of the three types.
Creating a Data Synchronization Job
A data synchronization profile must first be created in order to automate it as a replication process. The steps to achieve both Homogenous and Heterogeneous synchronization in Navicat Premium 12 were described in the Database Synchronization Strategies whitepaper. For the purposes of this tutorial, we’ll use the first example on Homogenous synchronization between the sakila and sakila2 databases.
Hint: Once you’ve created the sakila database, you can create the sakila2 database by right-clicking the connection in the Navigation pane and choosing New Database. Then enter the database name (“sakila2”) in the pop-up window.
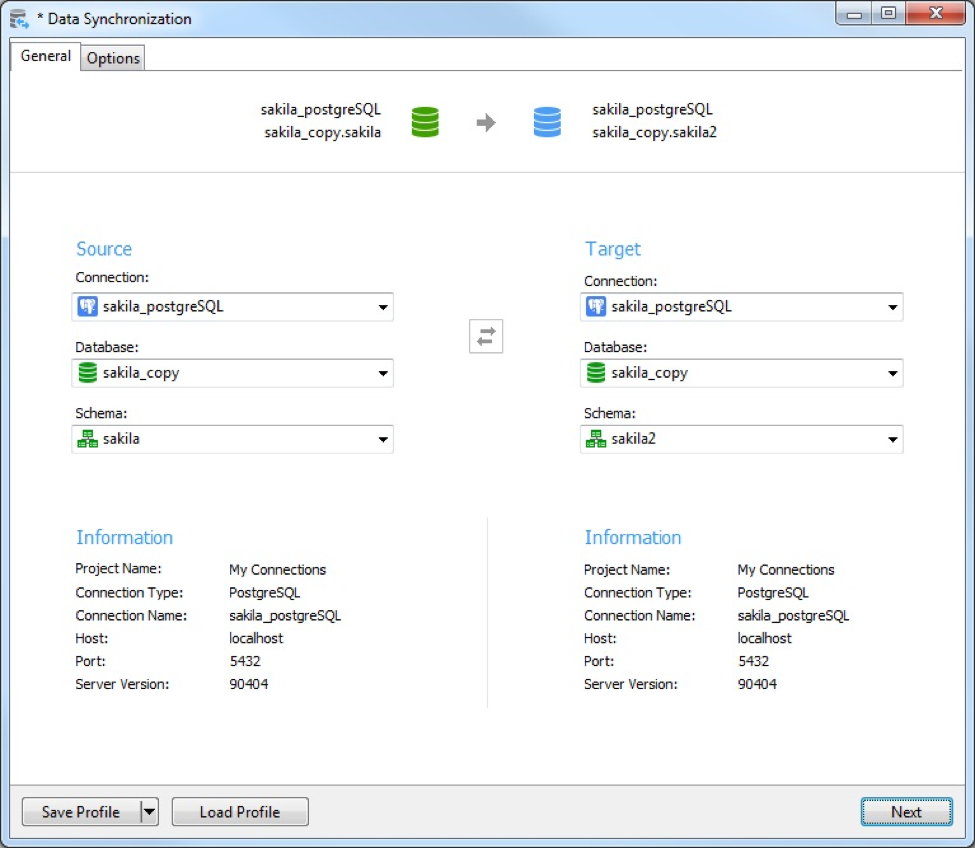
To open the Data Synchronization wizard:
- Select Tools -> Data Synchronization from the menu bar.
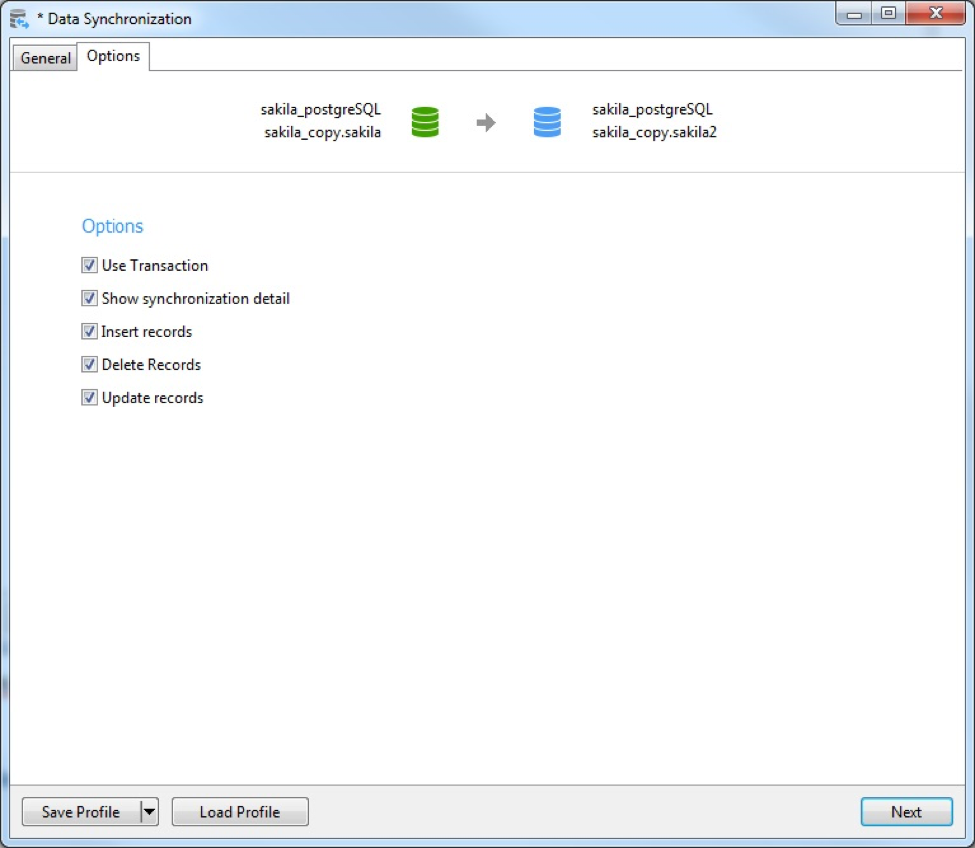
- The Data Synchronization Options tab contains only a few Compare Options checkboxes. We can leave them as is:
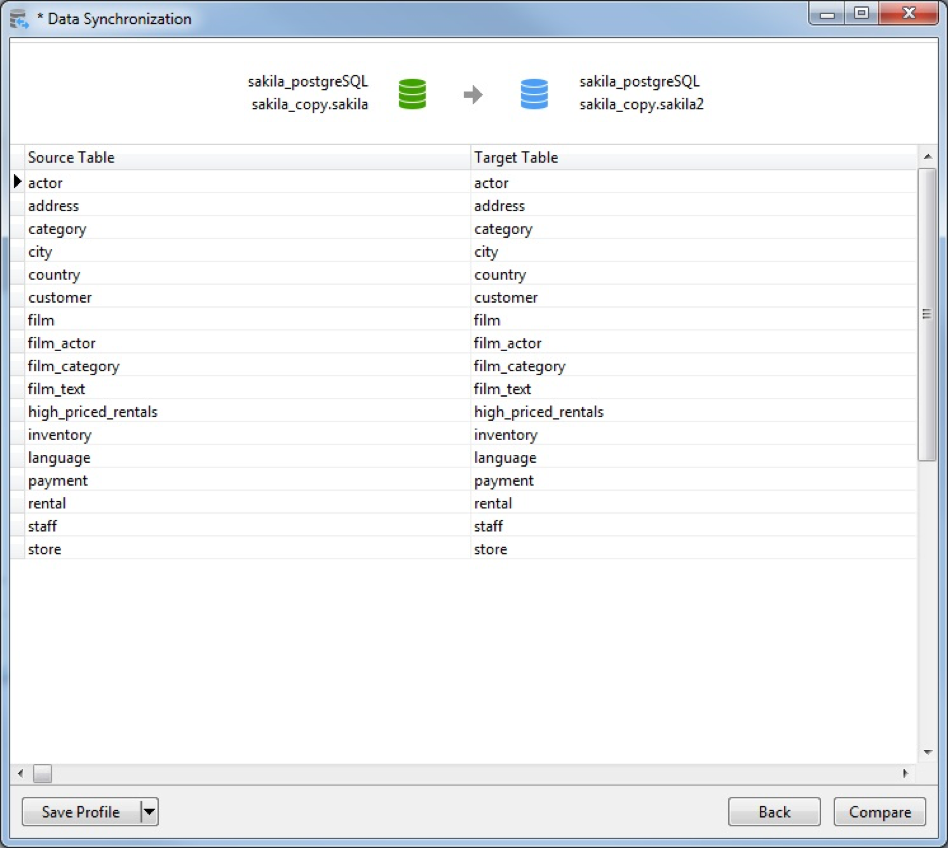
- The next step of the Data Synchronization wizard is for mapping tables. Target tables may be selected via a dropdown list. In this case, we don’t need to provide any mapping instructions as the tables in both databases are identical:
After comparing data, the window shows the number of records that will be inserted, updated or deleted in the target tables. You can uncheck the Show identical table and others option if you don’t want to include tables with identical data or tables with different structures – in other words, tables that won’t be updated. There are also checkboxes to deselect the tables or the actions you do not wish to apply to the target.
Selecting a table in the list displays the source and target tables’ data in the bottom pane. Values that differ between source and target are highlighted. As in the top pane, you can uncheck the records that you do not want to apply to the target.
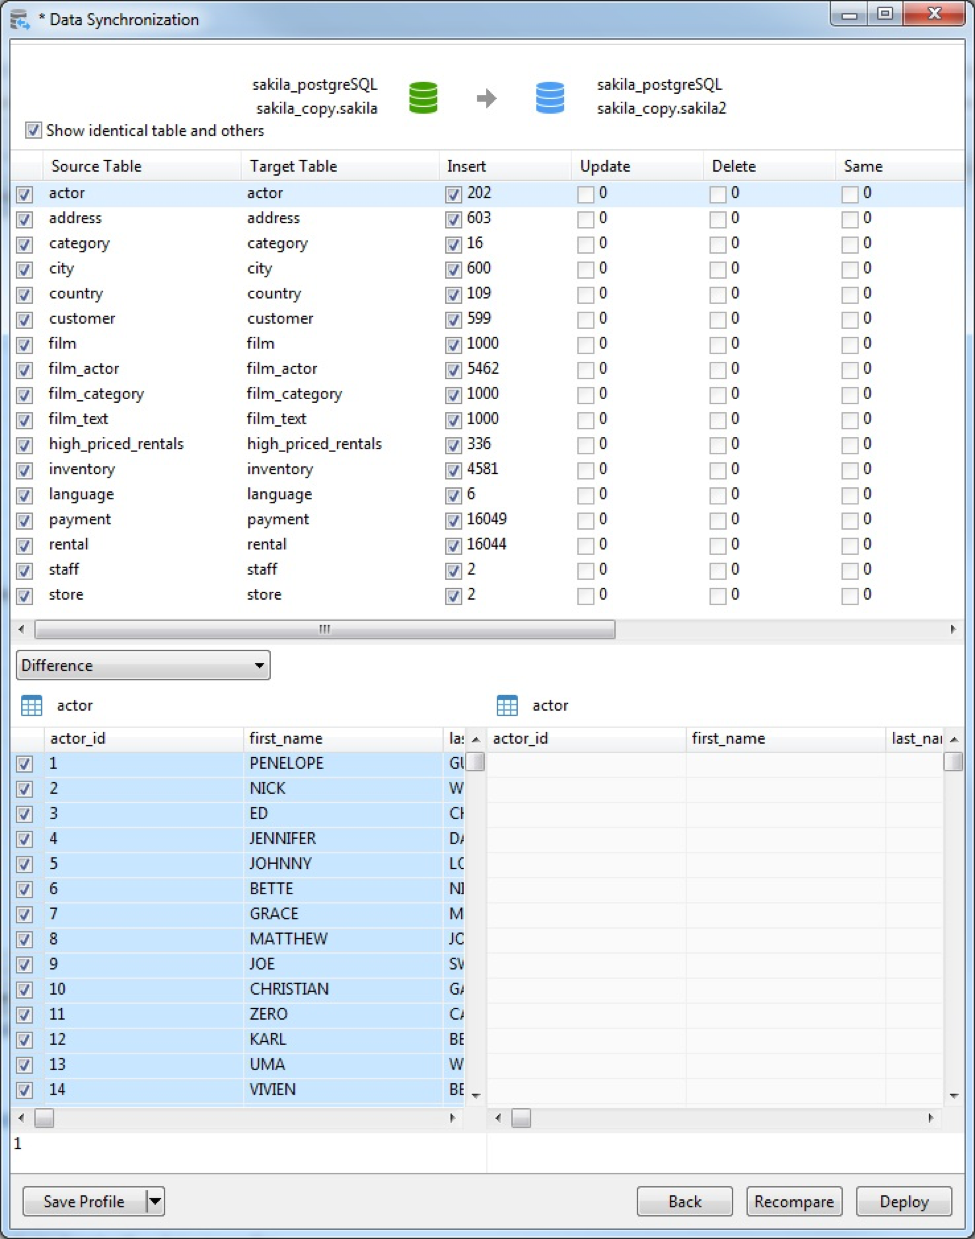
Difference Options
The kind of differences to show may be selected from a dropdown list. Here are the possible options:
- Difference: Show all records that are different in source and target tables.
- Insert: Only show the records that do not exist in the target table.
- Update: Only show the records that exist in both source and target tables having different values.
- Delete: Only show the records that do not exist in the source table.
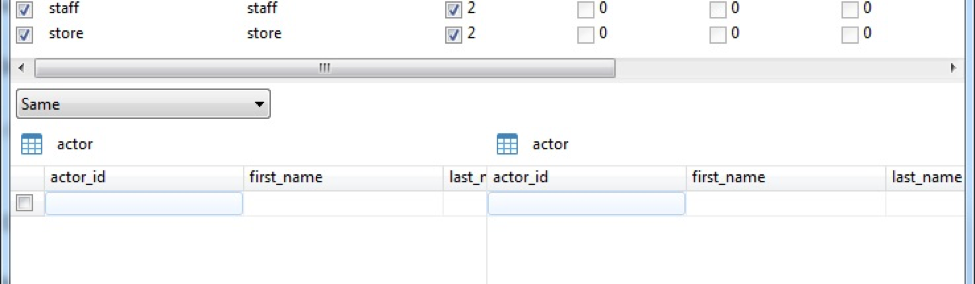
- Same: Show the records that exist in both source and target tables having identical values.
- All Rows: Show all records in source and target tables.
In our case, selecting “Update” or “Same” would show zero rows because there are no rows to update (only insert) and none the same:
As before, clicking the Deploy button generates and displays the Deployment Script:
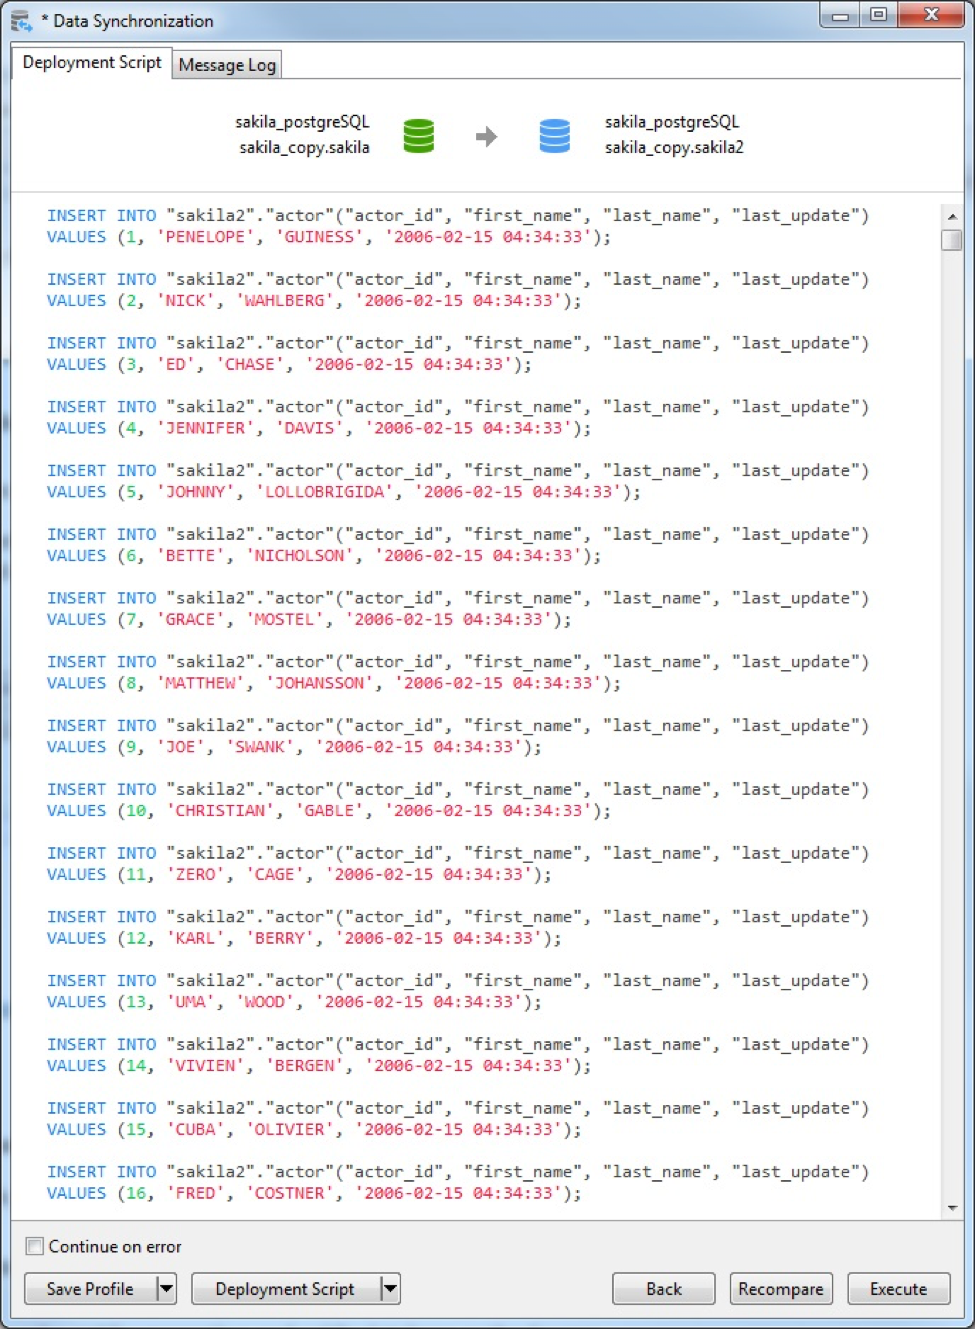
This screen, like all the previous ones, contains a Save Profile button that allows you to save your settings for future use. This particular screen also has a button for saving the Deployment Script.
You may still Recompare the two databases, or proceed to Execute the deployment script. There is a checkbox to Continue on error so that deployment does not halt upon encountering an error.
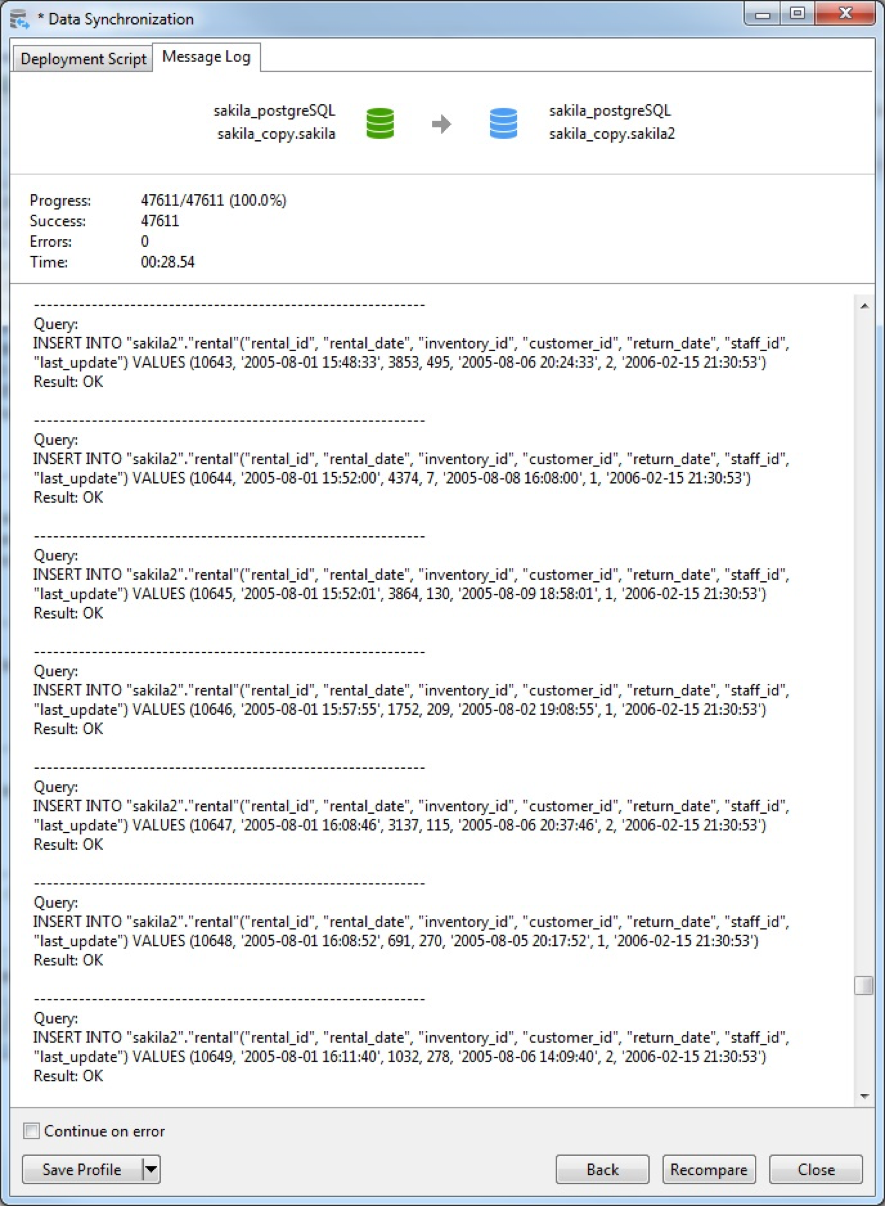
As the script executes, you may view its progress in the Message Log. It displays both the number of records processed and completed percentage:
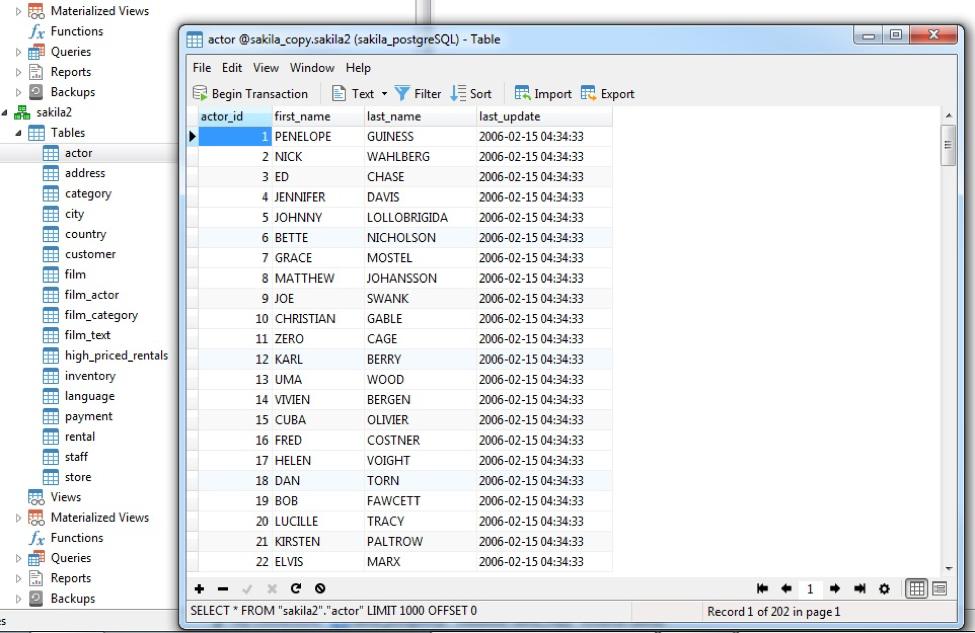
After closing the dialog, we can confirm that the sakila2 database tables now contain data:
Don’t forget to save the profile because the batch job will be utilizing it.
Creating a Batch Job
We will now employ Navicat’s Automation tool to setup a recurring replication between the sakila and sakila2 databases.
- To begin, click the Automation button in the main toolbar.
- Then click on New Batch Job in the Objects toolbar to open a New Batch Job tab.
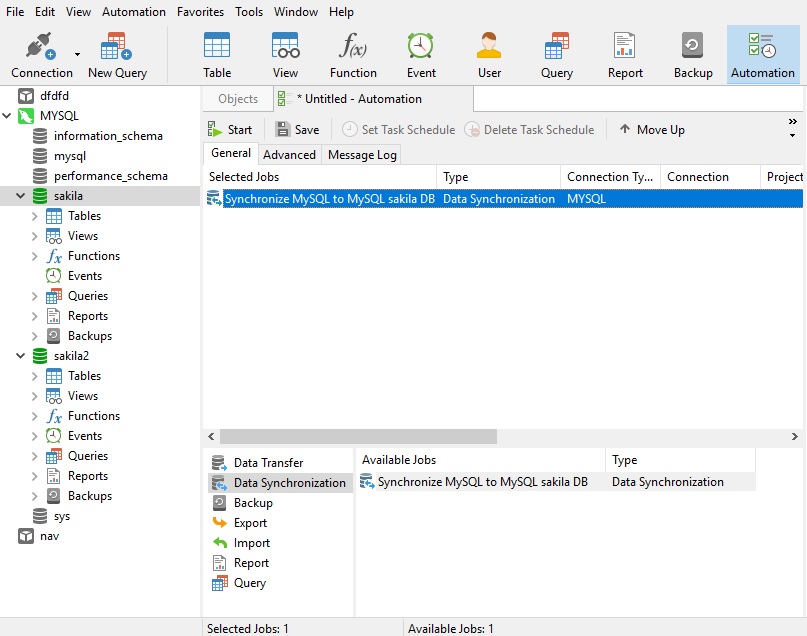
- Browse the source connection, database and/or schema on the in the Objects pane. That will make saved jobs for that database appear in the Available Jobs bottom pane.
In the Available Jobs pane, select the Data Synchronization job type, and then move the job from the Available Jobs list to the Selected Jobs list above by double-clicking or dragging it. (You can delete the jobs from the Selected Jobs list in the same way.) - Click the Save button on the Automation toolbar and provide a descriptive name in the Save dialog.
That will enable the Set Task Schedule and Delete Task Schedule buttons.
The General tab
In the General tab of the Task Schedule dialog, you may provide a description for the task as well as provide several options for its execution.
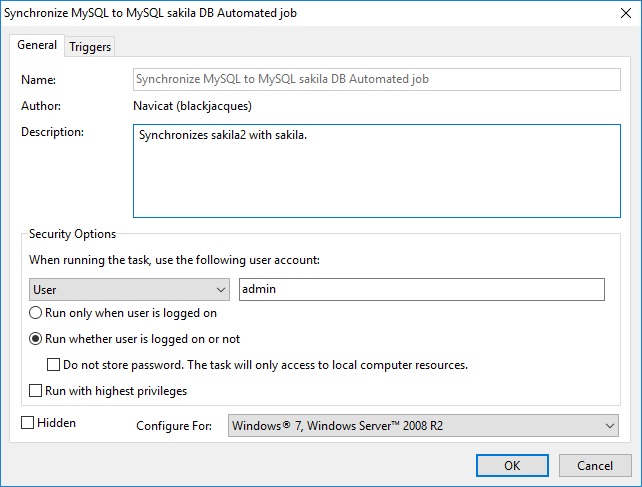
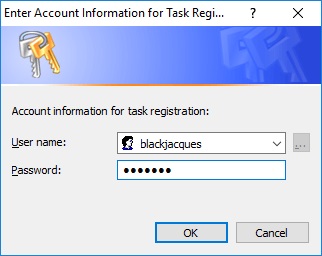
- Within the Security Options frame, you may configure which user or group account to run the task under. There is also an option to run the task whether the user is logged on or not. If you do choose that option, you'll have provide your OS user password in Windows Scheduler when you save the schedule.
You may also choose to run the task as Hidden as well as configure it to run on a specific operating system.
Triggering the Task
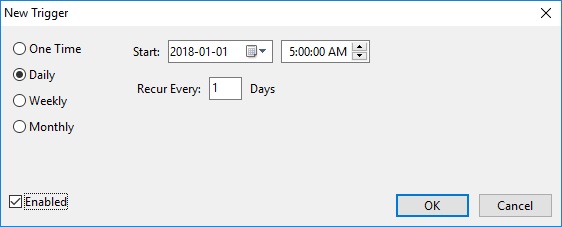
The Triggers tab lists the task's schedule. Tasks may be configured to run on a variety of schedules, including One Time, Daily, Weekly, Monthly, and according to just about any permutation of each.
Click the New... button to bring up the New Trigger dialog:
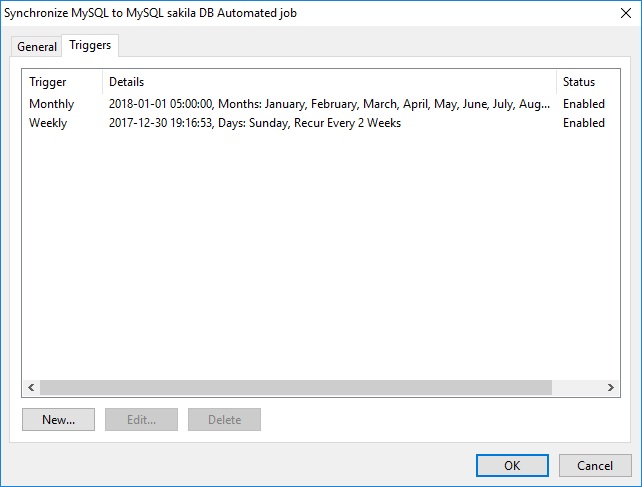
The same task may run according to numerous schedules. For instance, we could schedule our database synchronization task to run every first of the month as well as on every second Sunday:
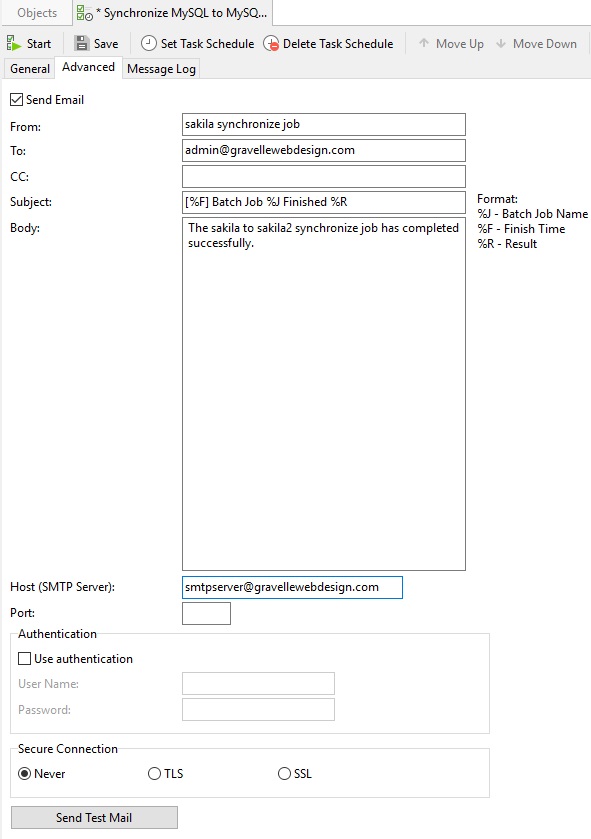
Set Email Notification
Navicat allows you to generate and send personalized emails with results returned from a schedule. The results can be emailed to multiple recipients. Check the Send Email option in the Advanced tab and enter the required information.
From
Specify the email address of sender. For example, “someone@navicat.com”.
To, CC
Specify the email address of each recipient, separating them with a comma or a semicolon (;).
Subject
Specify the email subject with customized format.
Body
Write email content.
Host (SMTP Server)
Enter your Simple Mail Transfer Protocol (SMTP) server for outgoing messages.
Port
Enter the port number you connect to your outgoing email (SMTP) server.
Use authentication
Check this option and enter User Name and Password if your SMTP server requires authorization to send emails.
Secure connection
Specify the connection to use TLS, SSL secure connection or Never.
Send Test Mail
Navicat will send you a test mail indicating success or failure.
Once you've finished configuring your automated job, you can test it by clicking the Start button in the Automation toolbar.
Merging Replication
As the name suggests, Merging Replication consists of combining data from two or more databases into a single database. As an exercise, we will merge the contents of the sakila and sakla2 databases into a third database named “sakila_merged” that will store the merged dataset.
The Required Data Synchronization Jobs
The Merging Replication job will require us to create and save two Data Synchronization profiles: one for each source database. The steps will be exactly the same as in the Creating a Data Synchronization Job section above, so we won’t reiterate them here.
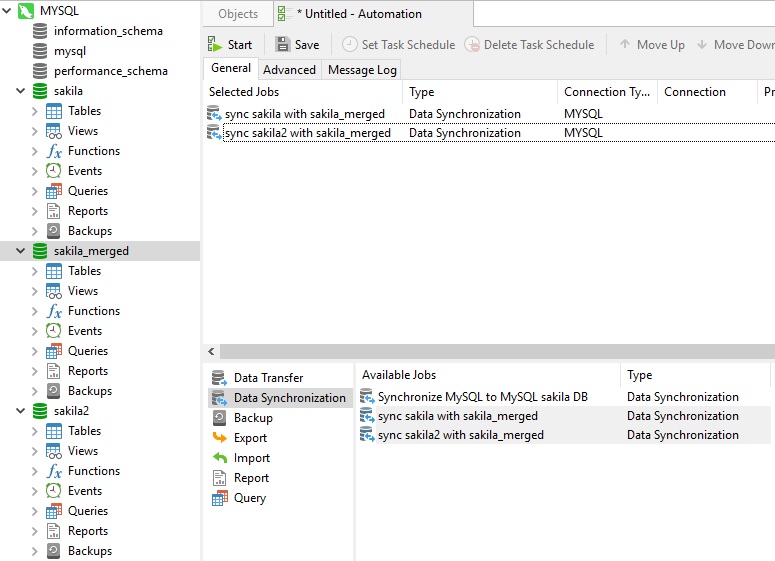
Creating the Batch Job
Batch jobs may be triggered by the source databases or by the target, as we did in the previous section on Snapshot Replication. However, it is usually easiest to trigger batch jobs from the target database since they will all reside on the same server. We'll do that here as well.
- Click the Automation button in the main toolbar.
- Then click on New Batch Job in the Objects toolbar to open a new batch job tab.
- Browse the source connection, database and/or schema on the in the Objects pane. That will make saved jobs for that database appear in the Available Jobs bottom pane.
- In the Available Jobs pane, select the Data Synchronization job type, and then move the job from the Available Jobs list to the Selected Jobs list above by double-clicking or dragging it.
- Click the Save button on the Automation toolbar and provide a descriptive name in the Save dialog. That will enable the Set Task Schedule and Delete Task Schedule buttons.
- In the General tab of the Task Schedule dialog, you may again provide a description for the task as well as provide several options for its execution.
- Within the Triggers tab, Tasks may be configured to run on a variety of schedules, including One Time, Daily, Weekly, Monthly, and within just about any permutation of each. This time, two jobs will execute rather than one.
- Once you've finished configuring your automated job, you can test it by clicking the Start button in the Automation toolbar.
Transactional replication
In Merged Replication, only the merged database contains all of the latest data. Each source database contains only the baseline data, plus whatever was inserted since it was first populated. In Transactional Replication, users receive full initial copies of the database and then receive periodic updates as data changes so that all databases are working with the same dataset. Keeping multiple databases in synch makes this the most complex replication type.
The Required Data Synchronization Jobs
With Transactional replication, the number of required Data Synchronization Jobs increases substantially because data must be replicated across all of the user databases. For example, say that we had three databases called sakila, sakila2, and sakila3. We could merge and propagate the full dataset across all of the user databases using a total of six Data Synchronization Jobs: three to merge the user databases, and another three to update them with the merged dataset.
Here is the Automation wizard with all six jobs:
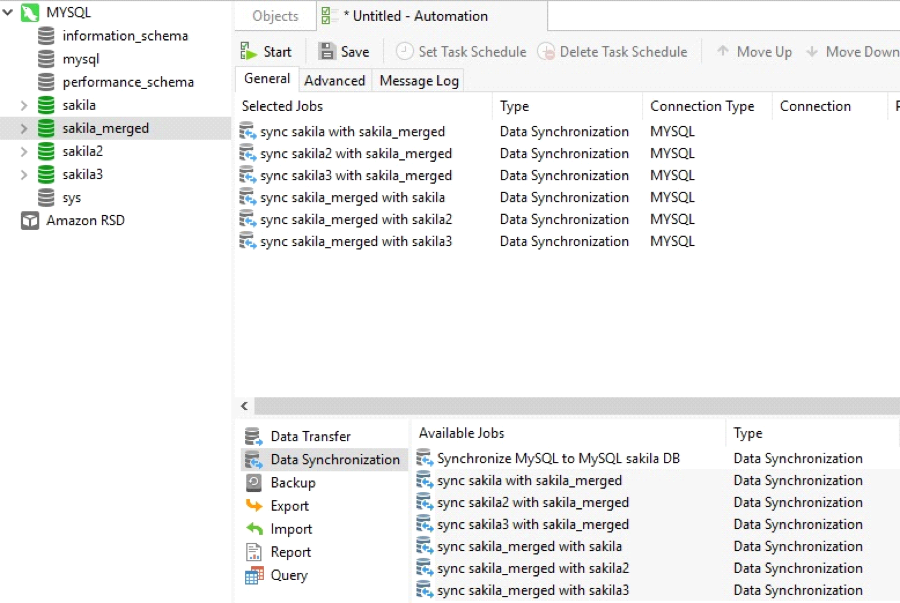
To allow sufficient time for the data merging to complete, it is best to split the jobs into two parts where the first merges the data and the second updates the user databases with the full dataset after a specified delay.
Here is what the Automation Job that propagates the merged dataset to the user databases might look like:
Running this job two hours after the first should provide plenty of time for the merging to complete. Hence, if the first job was scheduled to run at midnight, we would set this job to start at 2 Am:
Conclusion
In this follow-up to the Database Synchronization Strategies whitepaper, we covered how to automate database replication using Navicat Premium 12’s Automation utility. Used in conjunction with its Synchronization tool, it allows DBAs to automate various types of replication to run on a predefined schedule.
For more information about Navicat Premium 12, visit the product page.


