Data Transfer (Available only in Enterprise and Standard Edition)
Navicat allows you to transfer objects from one database/schema to another, or to a sql file (RDBMS) or a Javascript file (MongoDB). The target database and/or schema can be on the same server as the source or on another server.
Note: Available only for MySQL, Oracle, PostgreSQL, SQLite, SQL Server, MariaDB, MongoDB and Snowflake.
Note: Navicat Premium supports transferring table with data across different server types, e.g. from MySQL to Oracle. If the source connection is MongoDB, Navicat Premium only can transfer data to MongoDB server.
Hint: You can drag tables/collections to a database/schema in the Navigation pane. If the target database/schema is within the same connection, Navicat will copy the tables/collections directly. Otherwise, Navicat will pop up the Data Transfer window.
Transfer Data
Navicat provides a step-by-step wizard for you to complete the task:
In the main window, choose Tools -> Data Transfer.
Select the source connection, database, schema, and select the target connection, database, schema. (If you are transferring to a file, select the File option and specify the target path, SQL Format and Encoding.)
Hint: You can click
 to swap the source and target settings.
Click Options and select the transfer / advanced options.
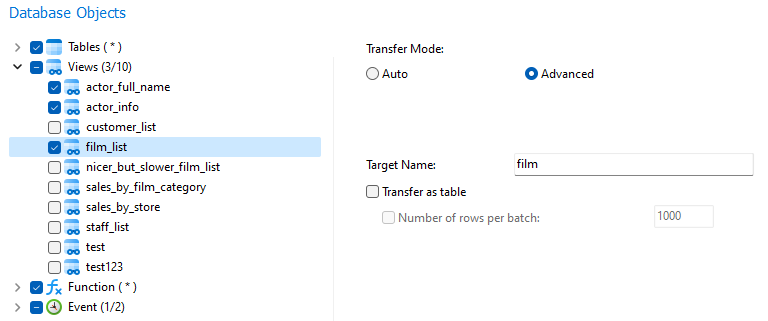
Select the specific objects you wish to transfer and set your preferred transfer mode. Click Next.
Review the summary of the objects being transferred.
Click Start.
Advanced Options
You can click the Options button to set the advanced options. The options depend on the source and target connection server types and sort in ascending order.
Option |
Description |
Continue on error |
Ignore errors that are encountered during the transfer process. |
Convert object name to |
Check this option if you require convert object names to Lower case or Upper case during the process. |
Create collections |
Check this option if you want to create collections in the target database. Suppose this option is unchecked and collections already exist in the target database, then all data will be appended to the destination collections. |
Create records |
Check this option if you require all records to be transferred to the destination database and/or schema. |
Create tables |
Check this option if you want to create tables in the target database. Suppose this option is unchecked and tables already exist in the target database/schema, then all data will be appended to the destination tables. |
Create target database/schema if not exist |
Create a new database/schema if the database/schema specified in the target server does not exist. |
Drop target objects before create |
Check this option if database objects already exist in the target database and/or schema, the existing objects will be deleted once the data transfer starts. |
Drop with CASCADE |
Check this option if you want to drop the dependent database objects with the cascade option. |
Include auto increment |
Include auto increment in the table with this option is on. |
Include character set |
Include character set in the table with this option is on. |
Include checks |
Include checks in the table with this option is on. |
Include definers |
Include the definers of the objects with this option is on. |
Include engine/table type |
Include table type with this option is on. |
Include excludes |
Include exclusion constraints in the table with this option is on. |
Include foreign key constraints |
Include foreign keys in the table with this option is on. |
Include indexes |
Include indexes in the table with this option is on. |
Include other collection options |
Include other options in the collection with this option is on. |
Include other table options |
Include other options in the table with this option is on. |
Include owners |
Include the owners of the objects with this option is on. |
Include rules |
Include rules in the table with this option is on. |
Include triggers |
Include triggers in the table with this option is on. |
Include uniques |
Include uniques in the table with this option is on. |
Lock source tables |
Lock the tables in the source database and/or schema during the data transfer process. |
Lock target tables |
Lock the tables in the target database and/or schema during the data transfer process. |
Maximum statement size |
Specify the maximum size (in KB) of individual extended INSERT statement that can be executed. If the row size exceeds this value, a normal INSERT statement will be used. |
Use complete insert statements |
Insert records using complete insert syntax. |
Use DDL from SHOW CREATE TABLE |
If this option is on, DDL will be used from SHOW CREATE TABLE. |
Use DDL from sqlite_master |
If this option is on, DDL will be used from the SQLITE_MASTER table. |
Use delayed insert statements |
Insert records using DELAYED insert SQL statements. |
Use extended insert statements |
Insert records using extended insert syntax. |
Use hexadecimal format for BLOB |
Insert BLOB data as hexadecimal format. |
Use ignore insert statements |
Insert records using IGNORE insert SQL statements. All ignorable errors that occur while executing INSERT statements will be ignored. |
Use replace insert statements |
Insert records using REPLACE SQL statements. If a row in the target table has the same value as the source for a PRIMARY KEY or a UNIQUE index, the row in the target is deleted before the new row is inserted. |
Use single transaction |
Check this option if you want to use a single transaction during the data transfer process. |
Use transaction |
Check this option if you want to use transaction during the data transfer process. |
Choose Objects to Transfer
All database objects are unselected in the Database Objects list by default. Check the database objects that you want to transfer.
(*) |
All the database objects being transferred to the target database/schema, all newly added database objects will also be transferred without amending the data transfer profile. |
(#/#) |
Only the checked database objects will be transferred. However, if you add any new database objects in the source database and/or schema after you create your data transfer profile, the newly added database objects will not be transferred unless you manually modify the Database Objects list. |
Transfer Mode
You can customize the Transfer Mode for the selected table/view. If you choose Auto, Navicat will transfer the table/view using the default settings. If you want to customize the transfer settings, choose Advanced and set the following options:
Option |
Description |
Target Name |
Enter the name of the table / view that will be created in the target database. |
All fields |
Transfer all fields in the table. |
Custom fields |
You can choose which fields to transfer. Click + and select the fields. Change the name of the target field if necessary. |
All rows |
Transfer all records in the table. |
Number of rows per batch |
Specify the number of rows of data per batch. If it is not enabled, all data in the table is sent to the target server as a single transaction. |
Custom recordsets |
Filter the records for transfer. Click + and enter an expression. |
Recordset Generator |
If your table is large, you may want to divide it to several record sets to avoid connection timeout. The Recordset Generator can divide the records into a number of recordsets as evenly as possible between the start and end values of a field. Set Field Name, Start Value, End Value and Number of Recordsets in the pop-up window. |
SQL Preview |
Show the SQL statements for returning the recordsets. |
Use transaction for each recordset |
Use a transaction for each recordset during the data transfer process. |
Transfer as table |
The view will be transferred to the target database as a new table. |
Save Profile
You can save your settings as a profile for future use or for setting up automation tasks. To open a saved profile, click the Load Profile button and select a profile from the list.
Hint: Profiles are saved under the Profiles Location.