RDBMS Data Editor
The RDBMS Data Editor allows you to interact with your data using two distinct layouts: Grid View and Form View. To switch the view, click  or
or  at the bottom.
Note: Form View is available only in Enterprise and Standard Edition.
Toolbar
The toolbar of the data editor provides the following functions for managing data:
Button |
Description |
|
Manage Profile - Manage the saved table profiles and view the profile information. |
|
Start a transaction. If Auto begin transaction is enabled in Options, transaction will be started automatically when opening the data editor. |
|
Make permanent all changes performed in the current transaction. |
|
Undo work done in the current transaction. |
|
Activate the cell editors for viewing and editing data. |
|
Filter and sort records by applying filter and sorting criteria for the data grid. |
|
Show / Hide columns. |
|
[Form View] Toggle a sidebar column pane, which allows you to browse and jump between records quickly. |
|
Show the underlying SQL statements that have been executed on the server during your current editor session. |
|
Leverage AI Assistant to populate synthetic data directly into your selected cells. |
|
Profile the data in the table. |
|
Import data from files. |
|
Export data to files. |
|
Generate data for the table. |
|
Apply masking techniques to shield sensitive information. |
|
Create a new BI workspace with a data source using the table data. |
 Begin Transaction
 Commit
 Rollback
 Cell Editor
 Fill with AI
 Data Profiling
 Import
 Export
 Data Generation
 Data Masking
 Create BI Workspace
Use Navigation Bar
Data Editor provides a convenient way to navigate among the records/pages using the Navigation Bar buttons.

Button |
Description |
|
Add Record - enter a new record. At any point when you are working in the data editor, click on this button to get a blank display for a record. |
|
Delete Records - delete an existing record. |
|
Apply Changes - apply the changes. |
|
Discard Changes - remove all edits made to the current record. |
|
Refresh - refresh the data. |
|
Stop - stop when loading enormous data from server. |
|
First Page - move to the first page. |
|
Previous Page - move to the previous page. |
|
Next Page - move to the next page. |
|
Last Page - move to the last page. |
|
First Record - move to the first record. |
|
Previous Record - move one record back (if there is one) from the current record. |
|
Next Record - move one record ahead. |
|
Last Record - move to the last record. |
|
Limit Record Setting - set number of records showing on each page. |
|
Zoom - magnify or reduce the text and cell size within the data grid. |
|
Grid View - switch to Grid View. |
|
Form View - switch to Form View. |


Pagination and Record Display Settings
Use the Limit Record Setting  button to enter the edit mode.
Limit records  records per page
Check this option if you want to limit the number of records showed on each page. Otherwise, all records will be displayed in one single page. And, set the value in the edit box. The number represents the number of records showed per page.
Note: This setting mode will take effect on current object only. To adjust the global settings, see Options.

Grid View
Grid View is a spreadsheet-like view that displays database records and fields as rows and columns. The integrated navigation bar allows you to quickly flip through records, insert new rows, or delete existing data.
To add a record
Click
 on the navigation bar, or press CTRL+N.
Type your data into the blank row.
Click another row or click
 on the navigation bar to save.
To edit a record
Click a cell.
Type your new data.
Click another row or click
on the navigation bar to save.
To edit multiple cells with the same data
Highlight a block of cells.
Type your data, and it will fill all selected fields at once.
Click Apply.
Note: These batch edits will only apply successfully to fields that possess a compatible data type for the value being entered.
To delete a record
Click the row you want to remove.
Click
 on the navigation bar, or press CTRL+DELETE.
Hint: If you have unchecked the Auto-apply single-record changes option in Options, you can make changes across multiple records and click Apply to save all updates at once.
Form View
Form View displays a single record at a time from a table, making it easier to focus on detailed data entries. The integrated navigation bar allows you to quickly flip through records, insert new rows, or delete existing data.
Click  Navigation to toggle a sidebar column pane, which allows you to browse and jump between records quickly. You can click the Choose Columns button to customize exactly which fields are shown within this pane.
To add a record
Click
on the navigation bar, or press CTRL+N.Type your data into the blank fields.
Click
on the navigation bar to save.
To edit a record
Navigate to the record you want to change.
Type your new data directly into the fields.
Click
on the navigation bar to save.
To delete a record
Navigate to the record you want to remove.
Click
on the navigation bar, or press CTRL+DELETE.
Edit Records
Edit Records with Special Handling
To set the cell value to an empty string or NULL, right-click the selected cell and select Set to Empty String or Set to NULL.
To view images in the grid, just simply choose View -> Display -> Show Image In Grid.
Hint: To view/edit images in an ease way, see Image Editor.
To edit a Date/Time record, just simply click
 or press CTRL+ENTER to open the editor for editing. Choose/enter the desired data. The editor used in cell is determined by the field type assigned to the column.
To edit an Enum record, just simply choose the record from the drop-down list.
To edit a Set record, just simply click
or press CTRL+ENTER to open the editor for editing. Select the records from the list. To remove the records, uncheck them in the same way.To view BFile content, just simply choose View -> Display -> Preview BFile.
To generate UUID/GUID, right-click the selected cell and select Generate UUID.
Edit Records with Foreign Key (Foreign Key Data Selection - Available only in Enterprise and Standard Edition)
Foreign Key Data Selection is a useful tool for letting you to get the available value from the reference table in an easy way. It allows you to show additional records from the reference table and search for particular records.
To include data to the record, just simply click
or press CTRL+ENTER to open the editor for editing. Then, double-click to select the desired data.Hint: By default, the number of records showed is 1000. To show all records, click
 . To refresh the records, click
  or press F5.
Click
 to open a pane on the left for showing a list of column names. Just simply click to show the additional column. To remove the columns, uncheck them in the same way.
Hint: To set column in ascending or descending mode, right-click anywhere on the column and select Sort -> Sort Ascending / Sort Descending.
Enter a search string into the Filter edit box and press ENTER to filter for the particular records.
Hint: To remove the filter results, simply remove the search string and press ENTER.
Copy Data from Grid View
Data that being copied from Navicat goes into the clipboard with the fields delimited by tabs and the records delimited by carriage returns. It allows you to easily paste the clipboard contents into any application you want. Spreadsheet applications in general will notice the tab character between the fields and will neatly separate the clipboard data into rows and columns.
To select data using keyboard shortcuts
CTRL+A |
Toggle the selection of all rows and columns in the data grid. |
SHIFT+ARROW |
Toggle the selection of cells as you move up/down/left/right in the data grid. |
To select data using mouse actions
Select the desired records by holding down the CTRL key while clicking on each row.
Select range of records by clicking the first row you want to select and holding down the SHIFT key together with moving your cursor to the last row you wish to select.
Select a block of cells.
Note: After you have selected the desired records, just simply press CTRL+C or right-click it and select Copy.
Paste Data into Grid View
Data are copied into the clipboard will be arranged as below format:
Data are arranged into rows and columns.
Rows and columns are delimited by carriage returns/tab respectively.
Columns in the clipboard have the same sequence as the columns in the data grid you have selected.
When pasting data into Navicat, you can replace the contents of current records and append the clipboard data into the table. To replace the contents of current records in a table, you must select the cells in the data grid whose contents must be replaced by the data in the clipboard. Just simply press CTRL+V or right-click and select Paste from the pop-up menu. Navicat will paste all the content in the clipboard into the selected cells. The paste action cannot be undone if you do not enable transaction.
Copy Records as Insert/Update Statements
To copy records as Insert/Update statement, right-click the column/row header or the selected cells and select Copy As -> Insert Statement or Update Statement. Then, you can paste the statements in any editors.
Copy Field Name
To copy field names as tab separated values, right-click the column/row header or the selected cells and select Copy As -> Tab Separated Values (Field Name only). If you want to copy data only or both field names and data, you can choose Tab Separated Values (Data only) or Tab Separated Values (Field Name and Data) respectively.
Save Data as a File
You can save the data in the table grid to a file. Simply right-click a cell and select Save Data As. Enter the file name and file extension in the Save As dialog.
Note: Not available when multiple selection.
Sort / Find / Replace Records
Sort Records
Server stores records in the order they were added to the table. Sorting in Navicat is used to temporarily rearrange records, so that you can view or update them in a different sequence.
Hover over the column caption whose contents you want to sort by, click the right side of the column and select Sort Ascending, Sort Descending or Remove Sort.
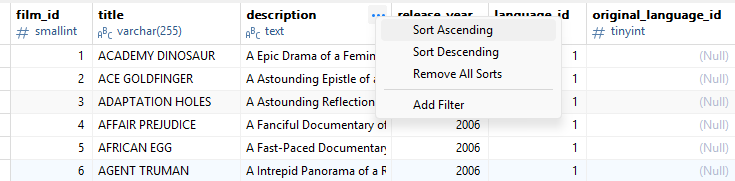
To sort by custom order of multiple columns, click  Filter & Sort from the toolbar.
Find Records
The Find bar is provided for quick searching for the text in the data editor. Just simply choose Edit -> Find or press CTRL+F. Then, choose Find Data and enter a search string. The search starts at the cursor's current position to the end of the file.
To find for the next text, just simply click Next or press F3.
Replace Records
In the Find bar, check the Replace box and enter the text you want to search and replace. Click Replace or Replace All to replace the first occurrence or all occurrences automatically. If you clicked Replace All, you can click Apply to apply the changes or Cancel to cancel the changes.
Find Fields
To search a field, just simply choose Edit -> Find or press CTRL+F. Then, choose Find Field and enter a search string.
There are some additional options for Find and Replace, click :
Option |
Description |
Highlight All |
Highlight all matches in the data editor. |
Incremental Search |
Find matched text for the search string as each character is typed. |
Match Case |
Enable case sensitive search. |
Filter Records
Use either of the following methods to filter the data in the grid:
Right-click a cell and select Filter -> Field xxx Value from the pop-up menu to filter records by the current value in the cell.
You can also customize your filter in a more complicated way by clicking
Filter & Sort from the toolbar. The Filter & Sort pane becomes visible at the top of the grid, where you can see the active filtering condition and easily enable or disable it by clicking a check box at the left.
Manipulate Raw Data
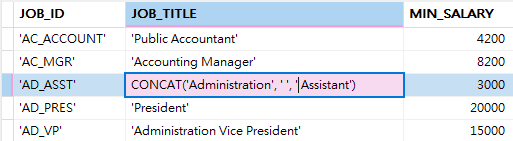
Navicat normally recognizes what user has input in a table as normal string, any special characters or functions would be processed as plain text (that is, its functionality would be skipped).
Editing data in Raw Mode provides an ease and direct method to apply server built-in functions. To access Raw Mode, just simply choose View -> Display -> Raw Mode.
Note: Available only for MySQL, PostgreSQL, SQLite, SQL Server, MariaDB and Snowflake.
Format Data View
Use the following methods to format the table:
Hint: Form View only supports Show/Hide Columns.
Move Columns
Click and hold the header of the column you want to move.
Move the pointer to your desired location.
Release the mouse button to reposition the column.
Freeze Column
If there are many columns in the table and you want to freeze one or more columns to identify the record, just simply right-click the column header and select Freeze Column or select from the View menu.
The frozen columns will move to the leftmost position in the table grid. This action will lock the frozen columns, preventing them from being edited.
To unfreeze the columns, just simply right-click any column header on the table grid and select Unfreeze All Columns or select from the View menu.
Set Column Width
Click right border at top of column and drag either left or right.
Double-click right border at top of column to obtain the best fit for the column.
Right-click the column header and select Set Column Width or select from the View menu. Specify width in the Set Column Width dialog.
Hint: The result only applies on the selected column.
Set Row Height
Right-click the row header and select Set Row Height or select from the View menu. Specify row height in the Set Row Height dialog.
Hint: This action applies on the current table grid only.
Show/Hide Columns
If there are many columns in the table and you want to hide some of them from the grid/form, just simply click  Columns. Select the columns that you would like to hide.
The hidden columns will disappear from the grid/form.
To unhide the columns, just simply click Columns. Select the columns that you would like to redisplay.
Show/Hide ROWID
If you want to display or hide the rowid (address) of every row, right-click anywhere on the table grid and select Show/Hide ROWID or select from the View menu.
The ROWID column will be showed in the last column.
Note: Available only for Oracle and SQLite.
View Field Information
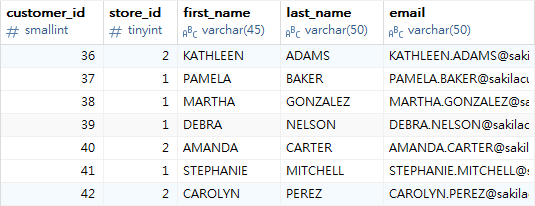
Data Type
You can display the data types of fields in the column header. To do so, right-click the column header and select Show Field Type.
Field Comment
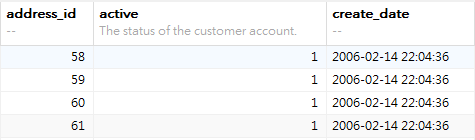
If you have added comments to the table fields, you can right-click the column header and select Show Comment. Field comments are displayed as the column header.
Note: Available only for MySQL, PostgreSQL, SQLite, SQL Server, MariaDB and Snowflake.
Save Table Profile
A Table Profile stores your custom filter, sorting rules, and column layout settings for quick reuse.
To save a profile
Click
 Table Profile and select Save Profile.
Enter the profile name and click OK.
The created profile will appear under the corresponding table object in the main window.
Hint: You can synchronize your profiles to Navicat Cloud or Navicat On-Prem Server. See Synchronize Personal Profiles.
To load a profile
Click
Table Profile and select Load Profile.Select the profile you want to load from the list.
Hint: You can also double-click the profile directly in the main window to open the table with your saved settings already applied.
View History
Navicat maintains a clear audit trail with a session history that logs all SQL statements executed since the current viewer was opened. Reviewing the history allows you to track modifications, errors, and verify exactly which commands were sent to the database.
You can click  History to show or hide the history pane at the bottom.